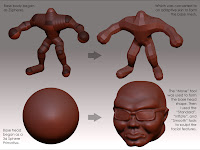
8 is separated into two pieces, his body and his head. Both were created using slightly different techniques.

The Body
The body began as a construct of ZSpheres (an interesting modeling tool in ZBrush). They're very easy to lay out, but a little tricky to get exactly what you're looking for from the final skin that gets created around them. The best advice I can give for making the conversion from spheres to skin, is just to play around and experiment with it. The good news is that you can preview any adjustments to make to the adaptive skin before actually having to create it.
Once I built the body with ZSpheres (minus the head because I knew I was going to build that later), I created the "Adaptive Skin". This basically wraps a mesh around the ZSphere object that you've built.

From that point, it's just scuplting. Using primarily the "Standard", "Inflate", and "Smooth" tools to push and pull the mesh into the shape you want. I turn the "Z Intensity" on the Standard and Inflate tools down to around 15 on low poly meshes. I also turn the Z Intensity on the Smooth tool down to around 30 for starters (ZBrush is nice enough to remember the intensity setting for each tool so you don't have to constantly shift them around).
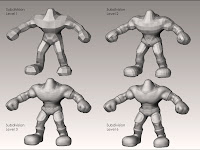
Once you've all the detail you can add to the mesh at its current level subdivide the geometry and add more detail. Once that detail is maxed out subdivide and add more.
TIP: Try not to get to far ahead of yourself with any one area. Work the detail up on the entire model as you go.
The Head
8 Baller's head began as a simple 3d Sphere primative, with all the default settings. Then I adjusted the size of the "Move" brush to ENORMOUS and began pushing, pulling, and shifting the sphere into the basic shape of a head. This is a VERY QUICK way to work and get the shape that you're looking for. The down side to this is topology is pretty much useless, and you can forget about an low poly models. However, if you plan for a retopologizing phase then you can correct both of those short comings.
After I had a basic head shape that I was happy with I used the same sculpting tools and techniques that I did on the body to work out the details. One thing to note is that you're already starting off at a pretty high level of detail when you start with the sphere primative.
SubTools
Once I had both the body and the head sculpted to the level I wanted I used the SubTools palette in ZBrush to combine the two pieces into one "Tool". I also used the 3d cylinder primative to create a simple base for the character to stand on and added that base to the Tool as well.
SubTools are a bit more indepth to really explain so I'll save that for a later date.
Hopefully this gives a little more insight as to how Lil 8 Baller got to where he is now. The next step is to retopologize him, more sculpting, final colors, then finally posing and rendering.


No comments:
Post a Comment