He's modeled, textured, detailed, posed and lit. I've now started the rendering for WakeUpCall. In this case the renders are broken up in to about a half dozen separate renders for things like the background, foreground, WakeUpCall himself and corresponding zDepth renders for depth-of-field and other effects to be assembled post-render.
Looking good so far I just hope my little computer can handle all the processing. I've had a couple of lockups already and I'm tweeking various rendering levels to compensate.
Showing posts with label City of Heroes. Show all posts
Showing posts with label City of Heroes. Show all posts
Saturday, August 22, 2009

Monday, April 27, 2009
Wake Up Call - in Color
 A delayed post. This is where I was about 2 weeks ago on the Wake Up Call character. That was before things got crazy busy at work, and I haven't had a chance to touch him since. I really like the stylized direction he's going and I've got a pretty big idea for the overall composition.
Now, if I can just wait for things to settle down long enough for me to get back to him.
Sunday, April 5, 2009
WakeUp Call
Next up is another mini-fig super hero. This one comes straight from the mind of Steve R (the same creator for ChocolateBunnyGuy). Obivously, he likes to live a little "outside the box".
WakeUp Call is a hero turned...well barnyard. He has multiple shapes but for this piece we're focusing on his "Rooster" form.

It's always fun to create non-human characters and I'd say the biggest challenge here was combining the non-human aspects with a believable humanoid form while at the same time staying true to the original character design from City of Heroes.
City of Heroes has an outstanding character creation system that allows you to create virtually anything you can think of (with one head, two arms, and two legs). However, since the request for "barnyard heroes" somehow hasn't made it to the top of the devs wish-list Steve R had to take some liberties with the given costume pieces to make the hero look like what he had in his mind. For example, since there is no "rooster beak" costume option, he went with a yellow gas mask. The beauty of what we get to do now is bring to life exactly what he has in mind for the character.
This picture shows the base pieces for the character. All the elements are there, just minus the details.
Friday, March 6, 2009
ChocolateBunnyGuy - mini-fig

All the wierdness has been ironed out and ChocolateBunnyGuy is ready to go. This is Stever's hero from City of Heroes and he's a very unique character indeed. The polygon strangeness was my mistake. With the seam problem, I was lucky enough to find a solution on the zBrush Central site. It seemed a little duct tapey, but it worked just fine.
Maya Weirdness
 I'm currently in the process of getting my zBrush model into Maya for rendering. It should be a good test since this model has multiple subtools and materials. Everything was going surprisingly well with a couple of (relatively minor) exceptions.
1. There are still some seems popping up in the displacement map.
2. There's an odd rendering weirdness going on with polygon objects that aren't using a displacement map, namely the belt and the chains. I expect that problem was either caused by the export to Maya or it's a problem entirely in Maya itself, which hopefully won't be too hard to track down and fix.
Other than those, he's coming along pretty well.
Saturday, February 28, 2009
Chocolate Bunny
Here's a very unique City of Heroes character called, "Chocolate Bunny"...currently a work in progress. Most of the base modeling is done but there are a number of accessories that still need to be created.


Sunday, January 25, 2009
More Lord Arachnos mini-fig progress

Here's the latest Lord Recluse update. I've blocked out his 8 mechanical arms and added his head (always a good step). Other than that, not much new.
Tuesday, January 20, 2009
Lord Recluse mini-fig body

Working on another mini-fig. This time around a villain, probably the most well known villain in City of Heroes, Lord Recluse. With his mechanical 8 arms attached to his back, he'll be probably the most involved mini-fig I could think of at the moment.
The 8 arms should also make posing him a pretty interesting job. Should be fun.
Sunday, January 18, 2009
ZBrush Materials Library
I was playing around with the extra ZBrush matcap library on the ZBrush site today and decided to make a couple of extra renders of the War Patriot mini-fig. I think they turned out pretty well...one thing's for sure, they REALLY make me wish I had a 3d printer (or that 3d prints weren't so dang expensive).
I could make a killer heroes/villains chess set.


I could make a killer heroes/villains chess set.


Saturday, January 17, 2009
War Patriot Mini-fig

Playing around with ZBrush and new projects for City of Heroes stuff. Here's the completed "War Patriot" mini-fig character. All in Zbrush. I had recorded the modeling of the head but my computer crashed resulting of a loss of the movie...lucky for me I had already saved the head model before it crashed.
Sunday, January 11, 2009
Mystery Figure Sculpt
Now, most of you would think I'd be jumping right on that ZBrush contest entry...especially since I got a late start on it. But to be honest, my comfort level with some of the ZBrush features is still not so high. And I wanted to minimize the "oh, crap I really shouldn't have done that like that" factor as much as possible. So I wanted to do one more figure real quick and at least get my feet wet with some of the features I hadn't experimented with before.
And to have a little fun with it I'm not saying who the sculpt is of, but I did try out the "time elapse" feature in ZBrush just to see how that worked. So in less than 4 mintues you'll see the entire figure (torso), take shape in the video above. I'm modeling the head from a sphere a little later (sorry). And a hint on the figure...you'd really have to play City of Heroes or visit my Deviant Art site a bit to pick up on who it is.
So, have fun and enjoy. The real sculpt took around 3 hours....so my speed is still a little lacking.
NOW I've got to jump on my ZBrush entry.
Sunday, January 4, 2009
Making 'lil 8
A friend of mine from Deviant Art inquired about a little more info on how I made 8. So here's the basics of it.
8 is separated into two pieces, his body and his head. Both were created using slightly different techniques.
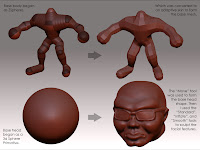
From that point, it's just scuplting. Using primarily the "Standard", "Inflate", and "Smooth" tools to push and pull the mesh into the shape you want. I turn the "Z Intensity" on the Standard and Inflate tools down to around 15 on low poly meshes. I also turn the Z Intensity on the Smooth tool down to around 30 for starters (ZBrush is nice enough to remember the intensity setting for each tool so you don't have to constantly shift them around).
8 is separated into two pieces, his body and his head. Both were created using slightly different techniques.

The Body
The body began as a construct of ZSpheres (an interesting modeling tool in ZBrush). They're very easy to lay out, but a little tricky to get exactly what you're looking for from the final skin that gets created around them. The best advice I can give for making the conversion from spheres to skin, is just to play around and experiment with it. The good news is that you can preview any adjustments to make to the adaptive skin before actually having to create it.
Once I built the body with ZSpheres (minus the head because I knew I was going to build that later), I created the "Adaptive Skin". This basically wraps a mesh around the ZSphere object that you've built.

From that point, it's just scuplting. Using primarily the "Standard", "Inflate", and "Smooth" tools to push and pull the mesh into the shape you want. I turn the "Z Intensity" on the Standard and Inflate tools down to around 15 on low poly meshes. I also turn the Z Intensity on the Smooth tool down to around 30 for starters (ZBrush is nice enough to remember the intensity setting for each tool so you don't have to constantly shift them around).
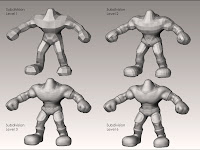
Once you've all the detail you can add to the mesh at its current level subdivide the geometry and add more detail. Once that detail is maxed out subdivide and add more.
TIP: Try not to get to far ahead of yourself with any one area. Work the detail up on the entire model as you go.
The Head
8 Baller's head began as a simple 3d Sphere primative, with all the default settings. Then I adjusted the size of the "Move" brush to ENORMOUS and began pushing, pulling, and shifting the sphere into the basic shape of a head. This is a VERY QUICK way to work and get the shape that you're looking for. The down side to this is topology is pretty much useless, and you can forget about an low poly models. However, if you plan for a retopologizing phase then you can correct both of those short comings.
After I had a basic head shape that I was happy with I used the same sculpting tools and techniques that I did on the body to work out the details. One thing to note is that you're already starting off at a pretty high level of detail when you start with the sphere primative.
SubTools
Once I had both the body and the head sculpted to the level I wanted I used the SubTools palette in ZBrush to combine the two pieces into one "Tool". I also used the 3d cylinder primative to create a simple base for the character to stand on and added that base to the Tool as well.
SubTools are a bit more indepth to really explain so I'll save that for a later date.
Hopefully this gives a little more insight as to how Lil 8 Baller got to where he is now. The next step is to retopologize him, more sculpting, final colors, then finally posing and rendering.Saturday, January 3, 2009
8 Baller (Fisher Price Style)

My son has about a million Fisher Price "Action Hero" figures. They stand around two inches tall and have minimal articulation at best, but they're pretty dang cute. They come in a variety of flavors, like Star Wars, or Marvel super heroes, Transformers, and even G.I. Joe.
I got an sudden curiousity as to what some of my City of Heroes characters would look like in this two inch format, which brings us to the image above. It's a first sketch, colors are a bit off, as is the material, and he's not posed at all. But he didn't turn out bad for a few hours work.
Subscribe to:
Posts (Atom)

 Posts

