Well, it's been almost a year now and my little experiment is just about done. I admit I'm a little disappointed in myself for not keeping up with the weekly posting as I had hoped. Still, I did learn a lot in ZBrush this year.
I have a much better understanding of the tools. I've experimented with a variety of work flows and building processes. I'm not very comfortable with incorporating ZBrush models in Maya, both with 32 bit displacement maps and normal maps.
I'm disappointed I had to drop out of ZBrush's "Create a Superhero" contest but I still learned a lot from watching the others develop and real-world work obviously takes priority.
This year also saw the release of a new ZBrush version which I'm sure will bring all new experiments and fun. But I'm afraid I won't have time to play around this year.
So I say "so long" with mixed feelings. Both encouraged by all that was learned, and yet disappointed I didn't do a better job overall. Maybe I'll be more organized and committed to 2010's project whatever that will be.
Sunday, December 27, 2009
Saturday, August 22, 2009
WakeUp Call - done

Finally all wrapped up. Here's the final illustration for "WakeUp Call". Modeled in ZBrush, rendered in Maya, post production work in Photoshop.
Rendering and Compositing of WakeUpCall
He's modeled, textured, detailed, posed and lit. I've now started the rendering for WakeUpCall. In this case the renders are broken up in to about a half dozen separate renders for things like the background, foreground, WakeUpCall himself and corresponding zDepth renders for depth-of-field and other effects to be assembled post-render.
Looking good so far I just hope my little computer can handle all the processing. I've had a couple of lockups already and I'm tweeking various rendering levels to compensate.
Looking good so far I just hope my little computer can handle all the processing. I've had a couple of lockups already and I'm tweeking various rendering levels to compensate.
Sunday, August 16, 2009
Overdue Update
Wow, no posts at all in July...I can't let that happen again. But not to worry, it's been my posting that's lacking...not my ZBrush usage.
I've learned a very helpful technique for quickly baking in some texture details from a tutorial video on the ZBrush site in the zClassroom. Here's a link to the classroom page: http://www.pixologic.com/zclassroom/homeroom/ and check out the MatCap to Texturemap video once you get there. It's simple and very straightforward. But you'll need to download the "image plane" plug-in from the plug-ins page before you can finish the tutorial.
ZBrush has also released a "natural media" painting plug-in for free. It looks interesting enough, but it doesn't look to replace Painter for those that use it and more than Alias Sketch would. Here's the link to the PaintStop page on the ZBrush site: http://www.pixologic.com/zbrush/features/PaintStop/. I plan on doing one or two pieces with the plug-in just as a test drive.
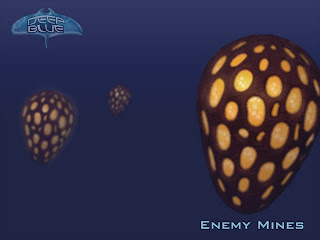
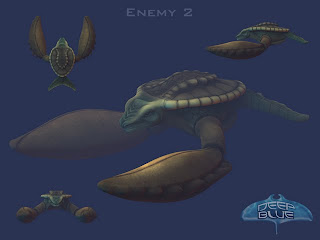
Now to current works. I've been working on an XNA game for the 360 and after all my attempts at vehicle/enemy design with traditional pencil and paper and other methods it was 3d sketching in zBrush that ended up putting me on the right track. Here are a few images of the models I've been working on.

More to come soon, I'll try not to be such a slacker on posting.
I've learned a very helpful technique for quickly baking in some texture details from a tutorial video on the ZBrush site in the zClassroom. Here's a link to the classroom page: http://www.pixologic.com/zclassroom/homeroom/ and check out the MatCap to Texturemap video once you get there. It's simple and very straightforward. But you'll need to download the "image plane" plug-in from the plug-ins page before you can finish the tutorial.
ZBrush has also released a "natural media" painting plug-in for free. It looks interesting enough, but it doesn't look to replace Painter for those that use it and more than Alias Sketch would. Here's the link to the PaintStop page on the ZBrush site: http://www.pixologic.com/zbrush/features/PaintStop/. I plan on doing one or two pieces with the plug-in just as a test drive.
Now to current works. I've been working on an XNA game for the 360 and after all my attempts at vehicle/enemy design with traditional pencil and paper and other methods it was 3d sketching in zBrush that ended up putting me on the right track. Here are a few images of the models I've been working on.


Tuesday, June 2, 2009
Success!
Special thanks to goast666 on the ZBrush Central forums for helping out with the import workaround.
The Problem: ...was happening not on export from ZBrush or even import on ZBrush, but importing directly into an existing subtool level to update the UV's with UV's laid out in an external app (in this case Maya).
The Solution:
1. "Store" a "Morph Target" on the subtool layer before you import the new OBJ.
2. Import the OBJ. At this point the scale and position will be totally off.
3. Hit the "Switch" button in the morph target UI to snap the newly imported OBJ into the correct position and scale.
4. Then "Delete MT" (delete the morph target) for a quick clean up.
Worked like a charm and kept all the new UV's intact.
Thanks again goast.
Monday, June 1, 2009
More Problems...
 This lovely image is what's happening to my Zbrush tool when I simply export each subtool out to a OBJ then import them right back in to the same position in the tool. As you can see, the scaling and position of the subtools goes out the window on import.
The export looks sound since I can import the OBJs into Maya and everything looks super.
In fact, after just doing a simply test in Zbrush....importing the individual subtools into ZBrush and the assembling them back into one tool ends up with great results. But that doesn't get the details and the color back onto the newly imported subtools.
Still working on this one....but I'm running out of duct tape.
Sunday, May 31, 2009
Transpose Problems
Well, I had planned on using Wake Up call to experiment with the "Transpose Tool Master" plug-in. And, in a way, I guess I have. Enough at least to run into a number of crashes and other problems.
I'm not sure if it's the complexity of the model, or the relatively limited RAM in my machine but it seems it just can't handle the processing.
Soooooo, the fall back is to rig the base mesh in Maya, pose it and export the new base mesh back to ZBrush. As you could imagine it's gonna take a bit more time.
Monday, April 27, 2009
Wake Up Call - in Color
 A delayed post. This is where I was about 2 weeks ago on the Wake Up Call character. That was before things got crazy busy at work, and I haven't had a chance to touch him since. I really like the stylized direction he's going and I've got a pretty big idea for the overall composition.
Now, if I can just wait for things to settle down long enough for me to get back to him.
Sunday, April 5, 2009
WakeUp Call
Next up is another mini-fig super hero. This one comes straight from the mind of Steve R (the same creator for ChocolateBunnyGuy). Obivously, he likes to live a little "outside the box".
WakeUp Call is a hero turned...well barnyard. He has multiple shapes but for this piece we're focusing on his "Rooster" form.

It's always fun to create non-human characters and I'd say the biggest challenge here was combining the non-human aspects with a believable humanoid form while at the same time staying true to the original character design from City of Heroes.
City of Heroes has an outstanding character creation system that allows you to create virtually anything you can think of (with one head, two arms, and two legs). However, since the request for "barnyard heroes" somehow hasn't made it to the top of the devs wish-list Steve R had to take some liberties with the given costume pieces to make the hero look like what he had in his mind. For example, since there is no "rooster beak" costume option, he went with a yellow gas mask. The beauty of what we get to do now is bring to life exactly what he has in mind for the character.
This picture shows the base pieces for the character. All the elements are there, just minus the details.
Monday, March 30, 2009
Alchemy + zBrush
"Lousy_Day" on the City of Heroes boards pointed me in the direction of a new drawing program of sorts called "Alchemy". It's a interesting little program and it's free. Calling it a "drawing program" may have been a little inaccurate...it's more of a creativity program.
At it's base it's a gestural drawing program with some very different tools and effects. Their site http://al.chemy.org/ posts a definition of the word alchemy as: "a process by which paradoxical results are achieved or incompatible elements combined with no obvious rational explanation."
While that's quite a mouthful, the more I toy around with the software the more I find that to be a pretty accurate description.
Based on a video posted on their site where a user combines Alchemy and zBrush, I thought I'd try the same experiment. So a took a few moments in Alchemy to draw this rather simple and very abstract black and white drawing. (you can tell by looking at it I had literally nothing in mind other than to create some interesting shapes)

Then I imported the image into zBrush as an alpha, inverted the colors, converted the alpha to a texture, and wrapped it around a basic head shape that I had pulled out of a primative sphere. Then by masking by intensity, I inflated, pushed and pulled on the masked head. Still, other than the head shape, I wasn't "going for" anything in particular. It could have been a helmet, an alien, a monster...or anything else centered around the head area.
In only a few minutes I began recognizing shapes and elements forming from all the pushing and pulling, and I just went with it. Subdivide up to the next level and keep going. By now I've deleted the mask to open up more options for sculpting.
And half and hour later I ended up with the model below.

Granted it's still pretty rough, but it's the beginnings of a futuristic, lion/humanoid creature. I must admit, it was a pretty darn fun process. I highly recommend it if you ever hit a creative block, or have a little free time to spare. I can honestly say, "You never know what you're going to create."
Check out the site, sign up for the alpha program and try out the software. Special thanks to "Lousy_Day" for introducing me to the software.
Friday, March 6, 2009
ChocolateBunnyGuy - mini-fig

All the wierdness has been ironed out and ChocolateBunnyGuy is ready to go. This is Stever's hero from City of Heroes and he's a very unique character indeed. The polygon strangeness was my mistake. With the seam problem, I was lucky enough to find a solution on the zBrush Central site. It seemed a little duct tapey, but it worked just fine.
Maya Weirdness
 I'm currently in the process of getting my zBrush model into Maya for rendering. It should be a good test since this model has multiple subtools and materials. Everything was going surprisingly well with a couple of (relatively minor) exceptions.
1. There are still some seems popping up in the displacement map.
2. There's an odd rendering weirdness going on with polygon objects that aren't using a displacement map, namely the belt and the chains. I expect that problem was either caused by the export to Maya or it's a problem entirely in Maya itself, which hopefully won't be too hard to track down and fix.
Other than those, he's coming along pretty well.
Saturday, February 28, 2009
Chocolate Bunny
Here's a very unique City of Heroes character called, "Chocolate Bunny"...currently a work in progress. Most of the base modeling is done but there are a number of accessories that still need to be created.


Thursday, February 26, 2009
Busy, Busy, Busy
So much Zbrush work...that I won't be able to show for a while. But not to worry. I've got a couple of mini-fig pieces coming up that are perfectly fair game for posting.
I've definately been getting plenty of Zbrush to Maya experience as well, which is always good.
I'll be posting the mini-fig images soon, and hopefully finishing up Lord Arachnos.
I've definately been getting plenty of Zbrush to Maya experience as well, which is always good.
I'll be posting the mini-fig images soon, and hopefully finishing up Lord Arachnos.
Saturday, February 14, 2009
Still Going
Just posting to say the last few weeks haven't been a waste, it's just that the Zbrush things I've been working have been work related and come with NDA's attached so I can't post anything just yet. But when the whole thing goes live I'll put up a model or two.
And I still need to finish up mini Lord Arachnos and post him when I have the time.
And I still need to finish up mini Lord Arachnos and post him when I have the time.
Sunday, January 25, 2009
More Lord Arachnos mini-fig progress

Here's the latest Lord Recluse update. I've blocked out his 8 mechanical arms and added his head (always a good step). Other than that, not much new.
Being Sick Sucks
Call it flu, cold, virus....whatever you want. Whatever it is that's going around this year ain't messing around. I've just been beat to death with this thing since last Thursday. With a temp of 103 the last thing I wanted my eyes to do was look at a monitor or TV screen.
And to make things better....I'm pretty sure the meds the doc gave me don't even phase this thing. Just trying to finish riding it out for now.
And to make things better....I'm pretty sure the meds the doc gave me don't even phase this thing. Just trying to finish riding it out for now.
Tuesday, January 20, 2009
Lord Recluse mini-fig body

Working on another mini-fig. This time around a villain, probably the most well known villain in City of Heroes, Lord Recluse. With his mechanical 8 arms attached to his back, he'll be probably the most involved mini-fig I could think of at the moment.
The 8 arms should also make posing him a pretty interesting job. Should be fun.
Monday, January 19, 2009
Retopo Success
 Finally, something I've been wondering about for a while now and could never seem to get a solid successful test of was the ability to create new topology for a model without losing the higher level details. I found a tutorial on using the "projection" brush....which really didn't seem to work nearly as well as I'd hoped. I also found a tutorial about tweeking a models topology, meaning making slight adjustments for added details, but never a brand new start on the topology.
All you ZBrush masters are probably thinking, "What's the big deal, it's simple." But I had never found a way to pull it off until this evening. It was actually combining several tutorial examples that gave me the final solution.
Again, for those more experienced folks this is probably a "no-brainer", but for me it's a huge step to understanding ZBrush.
Take a look at the image above and see the savings I was able to pull on poly count....and with better topology.
Sunday, January 18, 2009
ZBrush Materials Library
I was playing around with the extra ZBrush matcap library on the ZBrush site today and decided to make a couple of extra renders of the War Patriot mini-fig. I think they turned out pretty well...one thing's for sure, they REALLY make me wish I had a 3d printer (or that 3d prints weren't so dang expensive).
I could make a killer heroes/villains chess set.


I could make a killer heroes/villains chess set.


Saturday, January 17, 2009
War Patriot Mini-fig

Playing around with ZBrush and new projects for City of Heroes stuff. Here's the completed "War Patriot" mini-fig character. All in Zbrush. I had recorded the modeling of the head but my computer crashed resulting of a loss of the movie...lucky for me I had already saved the head model before it crashed.
Monday, January 12, 2009
Taking a hint?
I'd hoped to make up some time this evening on Vesuvious. However, two crashes and two hours lost later and I'm wondering if tonights such a good night to model.
In any case, I'm still trying to block out his head at the very least tonight.
In any case, I'm still trying to block out his head at the very least tonight.
Sunday, January 11, 2009
Mystery Figure Sculpt
Now, most of you would think I'd be jumping right on that ZBrush contest entry...especially since I got a late start on it. But to be honest, my comfort level with some of the ZBrush features is still not so high. And I wanted to minimize the "oh, crap I really shouldn't have done that like that" factor as much as possible. So I wanted to do one more figure real quick and at least get my feet wet with some of the features I hadn't experimented with before.
And to have a little fun with it I'm not saying who the sculpt is of, but I did try out the "time elapse" feature in ZBrush just to see how that worked. So in less than 4 mintues you'll see the entire figure (torso), take shape in the video above. I'm modeling the head from a sphere a little later (sorry). And a hint on the figure...you'd really have to play City of Heroes or visit my Deviant Art site a bit to pick up on who it is.
So, have fun and enjoy. The real sculpt took around 3 hours....so my speed is still a little lacking.
NOW I've got to jump on my ZBrush entry.
Wednesday, January 7, 2009
ZBrush Contest....I'm in.
Ok I've been watching the awesome ZBrush - "Action Hero" contest for a few weeks now and it's been incredible. There is so much inspiring talent there and I've learned quite a bit just following the threads and watching the techniques.
I've thought about it quite a bit and I've decided I'm gonna give it a shot. At the very least I should learn a ton by being contest focused on it. I have to say, with what I've seen in the contest so far, simply making the final 10 cut would be a huge 'win' in my book.
These folks are incredible.
With that in mind I present "Vesuvious".

This should be fun. For the entry thread and rest of the info check out the Contest Forum.
Sunday, January 4, 2009
Making 'lil 8
A friend of mine from Deviant Art inquired about a little more info on how I made 8. So here's the basics of it.
8 is separated into two pieces, his body and his head. Both were created using slightly different techniques.
From that point, it's just scuplting. Using primarily the "Standard", "Inflate", and "Smooth" tools to push and pull the mesh into the shape you want. I turn the "Z Intensity" on the Standard and Inflate tools down to around 15 on low poly meshes. I also turn the Z Intensity on the Smooth tool down to around 30 for starters (ZBrush is nice enough to remember the intensity setting for each tool so you don't have to constantly shift them around).
8 is separated into two pieces, his body and his head. Both were created using slightly different techniques.

The Body
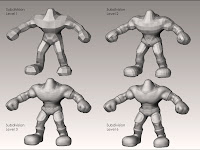
The body began as a construct of ZSpheres (an interesting modeling tool in ZBrush). They're very easy to lay out, but a little tricky to get exactly what you're looking for from the final skin that gets created around them. The best advice I can give for making the conversion from spheres to skin, is just to play around and experiment with it. The good news is that you can preview any adjustments to make to the adaptive skin before actually having to create it.
Once I built the body with ZSpheres (minus the head because I knew I was going to build that later), I created the "Adaptive Skin". This basically wraps a mesh around the ZSphere object that you've built.

From that point, it's just scuplting. Using primarily the "Standard", "Inflate", and "Smooth" tools to push and pull the mesh into the shape you want. I turn the "Z Intensity" on the Standard and Inflate tools down to around 15 on low poly meshes. I also turn the Z Intensity on the Smooth tool down to around 30 for starters (ZBrush is nice enough to remember the intensity setting for each tool so you don't have to constantly shift them around).
Once you've all the detail you can add to the mesh at its current level subdivide the geometry and add more detail. Once that detail is maxed out subdivide and add more.
TIP: Try not to get to far ahead of yourself with any one area. Work the detail up on the entire model as you go.
The Head
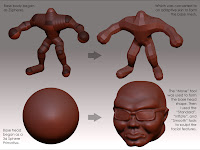
8 Baller's head began as a simple 3d Sphere primative, with all the default settings. Then I adjusted the size of the "Move" brush to ENORMOUS and began pushing, pulling, and shifting the sphere into the basic shape of a head. This is a VERY QUICK way to work and get the shape that you're looking for. The down side to this is topology is pretty much useless, and you can forget about an low poly models. However, if you plan for a retopologizing phase then you can correct both of those short comings.
After I had a basic head shape that I was happy with I used the same sculpting tools and techniques that I did on the body to work out the details. One thing to note is that you're already starting off at a pretty high level of detail when you start with the sphere primative.
SubTools
Once I had both the body and the head sculpted to the level I wanted I used the SubTools palette in ZBrush to combine the two pieces into one "Tool". I also used the 3d cylinder primative to create a simple base for the character to stand on and added that base to the Tool as well.
SubTools are a bit more indepth to really explain so I'll save that for a later date.
Hopefully this gives a little more insight as to how Lil 8 Baller got to where he is now. The next step is to retopologize him, more sculpting, final colors, then finally posing and rendering.Saturday, January 3, 2009
8 Baller (Fisher Price Style)

My son has about a million Fisher Price "Action Hero" figures. They stand around two inches tall and have minimal articulation at best, but they're pretty dang cute. They come in a variety of flavors, like Star Wars, or Marvel super heroes, Transformers, and even G.I. Joe.
I got an sudden curiousity as to what some of my City of Heroes characters would look like in this two inch format, which brings us to the image above. It's a first sketch, colors are a bit off, as is the material, and he's not posed at all. But he didn't turn out bad for a few hours work.
Friday, January 2, 2009
Harei
So what to create first? Honestly, it was the narrowing down of things that was the biggest challenge. And I've picked a character model from a book I wrote for my daughter.

May I introduce Harei. He's a very old, very long earred rabbit that lives in his Hollow, under a large tree. His dominant character elements are his oversized front teeth, and his large feet.

This initial model was created in around three hours (speed is not one of my strong points at this time). He started off as zSpheres. I layed out a based sculpt, followed by retopologizing him. Finally I worked out the basic details in his face. The majority of his body still has to be sculpted, especially his hands, but I'm pretty happy with the way things are going so far.
He walks with a cane and a slight limp so I'll probably have to bend him forward a little when I get to posing him. I also need to go back and do a better job of working out how his upper lip and teeth work out. Typically he is found in his usual waredrobe of a long white lab coat and pockets filled with all sorts of mysterious tools.
A Year of ZBrush
Hello all. My name is Todd Cowden. I'm an artist of a variety of sorts, from traditional illustration, digital painting, and 3d art to name a few. Browsing the ZBrush gallery toward the end of 2008 I was pretty amazed, and inspired enough to make a new years sub-resolution. That would be to really get to creating a variety of things with ZBrush in 2009.
For some unknown reason I seem to be more productive and stick to a schedule if I keep a journal of the progress. Which brings me to this. This is a blog that I plan on posting at least once a week some update on something I'm working on in ZBrush. It could be anything from a simple "proof of concept" technique test to a multi-post larger project.
Even though I'll be working primarily in ZBrush, as the name of the blog suggests, throughout the year I'll probably be relying on a variety of other software as well. These will most likely be Photoshop and Maya.
To anyone watching, hopefully you'll be able to spot some progression through the year. Maybe you'll even be able to pick up a small tip or two. Or even get in a small laugh or two.
So, let's begin. Hello 2009.
Subscribe to:
Posts (Atom)

